Showing posts with label Christmas. Show all posts

December 12, 2024

Picture Christmas Ornaments

 Its Christmas time...

One of my favorite parts of Christmas is family...

and my favorite part of putting up our Christmas tree is getting out our family ornaments. 

Each year everyone makes a new ornament to hang on the tree... we've made so many now I box up our kids so they can save them to have when they move out and have their own tree. 

I also make a new family photo ornament each year. 

These are my absolute favorites and I love each one!

Every year we take a new photo and I keep my eyes open for some kind of ornament frame to put them in. 

Here is a couple of new frame ornaments I ordered. 

They came in packs of 10 and 20... so I'll have some for future pictures :)

The snowflake photo frame is so cute and its double sided!

.............................


These round plastic ornaments are awesome!

Its so easy to print your photo, cut out, place in the circle and snap the cover on...

And its double sided so you can use 2 photos!


................................................
I also bought these heart ornaments for when my kids get married.
They are so cute!


...........................


Merry Christmas!

December 9, 2024

Crocheted Christmas Tree-Skirt

I love our little Christmas tree!

I haven't used a tree skirt in years, but this year I've been crocheting and I found a pattern for a tree skirt... 

so I thought I'd give it a try.

It was an easy pattern and like usual I make my own adjustments as I go...

it turned out pretty cute!

I wanted it to look like snow... and it sort of does, but I wish I would've put some silvery sparkly yarn in with it but it turned out good enough. 

You never know what I'll decided to do next year...

but now I have a little tree skirt... and the nice thing about crochet is I can always make it bigger if I want to or add some sparkly yarn on top :)  


Merry Christmas!

December 3, 2024

Light-up Cutout {Nativity}

Its not really looking like Christmas yet.... but we're hoping for snow soon :)

I made a new Nativity this year I wanted to share!

So it all started with a broken table in our garage... my youngest helper sanded the one side of the top and I was going to cut out the nativity silhouettes and stain them... (I've been planning this since last Christmas)

But when it came time to measure and cut... I saw a silhouette picture of Mary, Joseph and Jesus cut out in the middle in front of a Christmas tree... and that sparked a new idea!

...So I went back to my computer and re-designed my template so Mary, Joseph and Jesus would be cut out of the stable. 

... And I decided if I was going to have them cutout then I didn't want the wood very thick... so I went and bought a 2'x4' sheet of 1/4" plywood. 

(So now I have to think of another project for my broken table!)

I printed my template on regular paper... taped them together... and cut it out with an X-Acto knife. 

(the shelf I'm setting it on has only 18" clearance... so I had to adjust my printer settings to print just right)


I drilled a few holes and used my jig saw to cut out Mary, Jesus and Joseph.

(it worked pretty good, but the plywood chipped a bit on the edges...
cutting tip- cut it out from the back so the chips are on the backside)


I hadn't originally planned on putting extra pieces on the sides...

but... I decided it would look good to add some depth...


I used scrap wood to cut pieces for the sides and back

then glued it all together.

(these clamps from Harbor Freight are AWESOME!)


When I got everything glued... I had a crack between the top two boards...
so I added a star.
(you can definitely see the chips)


Stain combo:
whitewash 50/50 (water & white paint)- brush on and wipe off
while its still wet...
Minwax Dark Walnut- brush on
you can let it sit for 1-15 minuets depending on how dark you want it, then wipe off.
(the more porous the wood the darker the wood will be)
You can see the plywood sucked up more stain and is darker than the edges.


I bought fairy lights from Amazon (30 ft, battery powered with a timer... so it will turn on and off each night at a certain time)

I glued a command hook at the top to hang the battery pack...
then used clear tape to stick the lights on...
I just kept going around and around with the lights.

I had some moss ribbon so I glued it to the top...

(I thought it looked great, but my girls didn't love the moss... oh well)


It turned out GREAT!!


I'm super happy with how it turned out!

I love it!!! It's beautiful!!!

(I love how it lights up these special people!)

Merry Christmas

December 14, 2023

Shrinky Dink Ornament

Its almost Christmas already! What happened to this year?! It has flown by so fast!

Each year I make or order an ornament with our family picture. This year I decided to try making one with Shrinky Dink plastic. 

This stuff is so fun and super easy to use!

You can make just about anything you want... and they are really durable. 

I really like how it turned out!... and it should last for a very long time. 

So if you don't know how to use Shrinky dink plastic let me show you...

Its really quite fun!


December 2, 2019

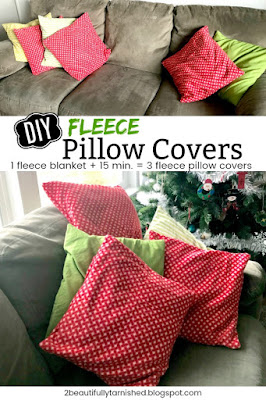
{Easy} Fleece Christmas Pillow Covers


It's beginning to look a lot like Christmas at our house...

I have a super easy project I wanted to share... its perfect for this time of year.

I made 3 fleece pillow covers that are so soft and cozy in about 15 minutes out of 1 blanket.

It doesn't get much better than that!

The blanket was one of those 50x60 inch throws that you can find just about anywhere... I think I've seen them at Walmart for as low as $3. There are so many different patterns and colors to choose from! So not only is this project easy, its cheap as well. 

These pillow covers were so easy to make and they're so soft that I might just have to make more.

I've listed all the measurements and instructions of how I made these pillow covers, so help yourself if you want to give it a try. 

December 24, 2018

December 11, 2018

my little Christmas tree

I love my small Christmas tree, because it is the only one I get to choose how to decorate. I guess that’s how it is when you have a family and kids… they kind of dictate how the big tree is decorated {with a little help}.